Tuesday, March 13, 2012

Going Solar to Set Your Soil Straight

Everybody knows that sunlight makes plants grow. But did you know that solar energy can help you “grow” healthier soil? If not, welcome to the solar-powered world of soil solarization!

Solarization is a safe, non-chemical, and effective method for controlling the host of pests and diseases which might be lurking in your garden soil -- harmful bacteria, fungi, and nematodes, as well as insect eggs, root-gnawing larvae, and weed seeds.

Of course, most of your landscape gets along just fine without special intervention, but for vegetable gardeners and folks with specialized garden beds, such as dahlia collections or an annual cutting garden, going solar can help prevent problems, while enhancing any site’s horticultural performance.

Solarization is a creative spin on the greenhouse effect, which uses simple plastic sheeting and the sun’s radiant energy to help sanitize the top six to eight inches of garden soil. And although the process does require setting aside a garden area for about two months during the summer, it is far safer and less expensive than using toxic soil pesticides or other fumigation methods.

Experienced gardeners know that they should rotate their vegetable crops each year and select disease-resistant varieties to control soil-borne diseases. However, this is not always a practical option for some gardeners with limited space, and after a while, any soil used and planted repeatedly with similar crops will be still be infested with damaging populations of the most persistent pathogens, like verticillium and fusarium wilt, as well as parasitic nematodes, along with other weed and pest problems.

By using solarization to dramatically elevate soil temperatures up to 140 degrees for a period of weeks, you can essentially bake those problems away. Moreover, solarized soil is rapidly re-colonized by beneficial bacteria and fungi, such as those which help fix nitrogen in the soil, while yet other beneficial microorganisms will fill the void to help fight off pathogens in the future. In short, your soil will be healthier and better able to enhance plant growth and crop yields.

To begin, select a garden bed or planting area at least 30 to 36-inches wide, which is normally the most practical width for planting. Smaller strips probably will not generate or retain enough heat to be effective.

Remove all visible vegetation and other plant debris, and then cultivate the soil to a depth of six inches or more. It is generally preferable to use a rototiller to break up any clumps and provide a smooth, friable medium. Keeping the texture of the soil smooth is essential to prevent the formation of air pockets which will interfere with heat generation and conduction. Also, carefully rake over the surface of the planting area to ensure that it is completely free of stones or other coarse materials which might tear or puncture the plastic sheeting.

During cultivation, be sure to add any desired organic amendments such as compost, or any fertilizer or lime, which might have been called for by a soil test. If you are planning to use soaker hoses or drip irrigation, you should put those elements in place now. Please note that after solarization, you do not want to till or disturb the soil, as that will only expose buried weed seeds. Finish by digging a trench approximately six to eight inches deep and wide around the perimeter of your garden bed.

Next, water the planting area thoroughly. Use a sprinkler or soaker hose system and let it soak the prepared soil for at least several hours, penetrating almost to a depth of one foot. Every square inch of soil must be moistened for adequate heat generation.

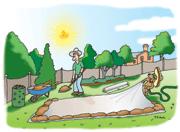
Afterwards, cover the area with a clear plastic sheet made from UV-stabilized or resistant polyethylene or PVC. Untreated plastic film will degrade in sunlight, and neither black nor opaque plastic will generate sufficient heat.

Selecting the proper thickness of plastic tarp is important. While very thin film (.5-1 mil) is less expensive, it tends to rip very easily, and would only be suitable for one use. Thicker plastic (4-6 mil) is tougher and lasts longer, but does not allow as much more sunlight to pass through. Instead, try to find a medium sheet (1-3 mils), and stretch the plastic tight and smooth across the planting surface.

In addition, for increased effectiveness, consider using a double-layer of plastic with an insulating air space between the layers. You can easily separate the two layers using empty aluminum cans. The extra layer can increase soil temperatures by another six degrees, while also retaining more heat on overcast days and at night.

After getting your plastic firmly in place and tucked down into your trench, backfill with soil to bury the ends of the sheet – and just wait for the sun to do the rest. If your solarized bed is in an especially windy location, you might want to place some bricks or rocks on top of the trenched area as an additional anchor.

For the most part, solarization should be undertaken anytime during the hottest, brightest months, from June through August. It can be done earlier or later, but additional time under wraps would be required, up to three months. Traditional summertime treatment requires four to six weeks, and as much as eight, if the skies were particularly cloudy, or if you have been plagued with stubborn, noxious weeds for years.

After solarizing, carefully remove and store the plastic for another use in a subsequent year. You garden bed is now ready for planting. If you do not plan to plant for several months, with a cool weather crop, for example, be sure to cover the bed with a weed-free mulch.
Lastly, remember that solarization only eliminates or reduces pest organisms and weed seed from the top several inches of soil. Do not disturb your sanitized soil any more than is necessary to slip in your new plants.

Copyright 2012, Joseph M. Keyser

Sunday, March 11, 2012

Dwarf Citrus Trees: Big On Flavor & Fragrance

During the cold, gray days of winter, few things brighten and warm a room like the sweet, rich aroma of lemon blossoms or the glow of maturing oranges among glossy, green leaves. Thanks to the widespread cultivation of dwarf citrus trees, any gardener with a bright window can enjoy all the sensory pleasures of lemons, limes, oranges, and more, all year long.

Like most fruit tree cultivation, where a branch or scion of a desirable variety of tree is grafted onto a sturdy rootstock, dwarf citrus trees are grafts of a normal fruit-bearing branch onto dwarf rootstock, which keeps the plant at a manageable size for summer patios and year-round enjoyment in your solarium.

Because the fruiting branch is from a full-sized tree, the fruits which develop are also full-size, and full-flavored. However, that also means that like a dutiful orchard manager, you will have to prune your tree periodically to keep it within bounds. Normally, pinching off growing tips will help maintain an attractive shape, which is preferable to letting the plant send out tall shoots requiring severe pruning.

In addition, always remove shoots or “suckers” which tend to pop out from the dwarf rootstock. Look for a diagonal scar running the trunk’s circumference around about six inches above the soil surface. Snip off any shoots below the graft union as those pesky shoots will sap energy from the desired plant, and produce, if at all, inconsequential or tasteless fruits.

The majority of dwarf citrus used as container or houseplants tend to grow between four and six feet tall, and do best in pots ranging from 12 to 16 inches in diameter, although some popular cultivars can be grown in containers as small as eight inches.

In milder climates, dwarf trees can reach up to nine to 12 feet when grown in halved whiskey barrels or redwood tubs. Around here, though, citrus must be taken indoors before any danger of frost, and most of us would rather not lug a several hundred pound giant into a standard family room.

To keep your dwarf citrus in check, you will actually borrow some techniques from the world of bonsai. Root pruning is usually required every three years or so, which will control overall growth, while also allowing you to replenish soil and soil nutrients. Without root pruning, you will have to continually repot your specimen until it becomes a behemoth.

To begin, carefully remove the plant from its pot and use a sharp knife or pruning shears (or even a pruning saw) to trim off several inches of root from around the sides and bottom of the root ball. Use a standard container soil mix to replace and reposition the plant at its previous height in the pot.

Incidentally, root pruning is often traumatic for many novices, who are more comfortable with watering and feeding their plants. But fear not, eventually everyone gets used to it, and your tree will continue to thrive and flourish for many years, possibly even dozens or more.

Ongoing care for your dwarf citrus requires plenty of bright light and even exposure. Be sure to slowly rotate containers every week or so. After all, no one likes a lopsided lemon tree.

Dwarf citrus prefer evenly moist soil. Do not allow the soil to completely dry out, and do not waterlog the soil or allow the plant to sit in standing water. Many practitioners consider an inexpensive moisture meter indispensable and as important as a good pair of pruning shears. Plan to water a bit more frequently than you might with other houseplants, perhaps every three to four days, especially during warm, dry weather.

Note that citrus are heavy feeders, especially as frequent watering will leach out water-soluble nutrients like nitrogen. It is recommended to use a fertilizer with a ratios two to three times higher in nitrogen than potassium and phosphorous (an N-P-K of 3-1-1). Be sure to use a complete fertilizer periodically to replenish essential micronutrients.

Of course, the most important element in dwarf citrus cultivation is selecting a plant that will intoxicate you with its fragrance and tickle your taste buds.

The choices are delicious in their own right, ranging from typical naval oranges, tangerines, lemons, true limes and grapefruits, to a host of hybrids with special characteristics. For the most part, growers have selected varieties specifically for container and indoor use which will do well in relatively cool environments. You do not have to replicate Floridian heat to achieve sweet and luscious fruit.

Among oranges, some of the most readily available and favored are Trovita, with a thin skin, which is equally prized for juice or eating. Satsuma oranges, sometimes considered a mandarine, like Valencia, are smaller, with an easy-to-peel fruit and a truly intoxicating aroma from spring-borne blooms which last up to a full month.

And while oranges might be the first citrus variety you are considering, spare a thought for the lemon tree. While most citrus bloom in the spring and produce fruit the following winter (or later), lemons actually bloom throughout the year, providing four seasons of fragrance, and year-round fruit. The most popular varieties include Lisbon, Eureka and Meyer, the latter of which is thought to be a cross between a sour orange and a lemon, and is perhaps the most popular variety of all thanks to its somewhat sweeter, slightly tangerine flavor.

Limes aren’t only for margaritas and gin-and-tonics! In addition to favorites like Bearss Seedless, one of the most intriguing offerings is Kaffir (or Thai) lime. In addition to tangy juice and a zesty zest, the glossy, dark green leaves of this variety can be chopped or julienned and used much like lemon-grass in Thai and other related Indonesian cuisine.

And while grapefruit are available, why not explore the exciting world of hybrids. For example, consider the increasingly popular Minneola Tangelos, or Honeybell, a cross between tangerines and grapefruit. This juicy, bell-shaped find offers a bright, reddish-orange skin, easily peeled like its tangerine ancestor, and sharing both a tartness and intense tangerine flavor.

Clearly, while these varied citrus trees may be dwarf in size, the selection, flavors, fragrance, and rewards of raising them are truly enormous.

Copyright 2012, Joseph M. Keyser

Friday, March 09, 2012

Cleaning Your Home of Biological Pollutants

Be it ever so humble, there's no place as deadly as home. Well, that's not strictly true, even though most accidents occur in the home, including most auto accidents taking place within five miles of home sweet home. What a deathtrap! But seriously, the fact is that most of us still spend a considerable part of every day indoors. Safely tucked away in the family room or kitchen, few of us realize that we are being exposed to a host of potentially harmful biological pollutants, which in varying cases can cause mild discomfort, often confused with a simple lingering cold, or more severe illnesses with long-range health complications.

Looking around our homes, it might be hard to imagine that our pets, humidifiers, and carpeting can represent sources for biological contamination. In fact, for most people a damp towel or face cloth or a soggy bath mat produces nothing more than a sour smell, and
"contamination" is an extreme way of viewing that spot of unsightly mildew in the shower stall. However, many other individuals are highly susceptible to these pollutants, including the elderly, young children, pregnant women, and people with respiratory problems such as
asthma, chronic allergies, and lung disease. For this at-risk community, biological pollutants deserve both attention and corrective action.

Contributors to contamination

Many of the causes of biological pollution are hard to avoid, even in the cleanest homes, and include everyday activities like cooking and showering, which result in the high moisture levels conducive to the spread and growth of mold, mildew, dust mites, and other unwanted guests, all of which can, in turn, lead to health complications. In fact, the "moisture connection" is one of the most widespread causes for contamination, although it is one of the easiest to remedy.

Among the other common sources are pollen, infectious agents like bacteria and viruses, microscopic dust mites living on household dust, cat saliva and other pet dander -- the tiny or microscopic scales from skin, hair and fur, and feathers. Macroscopic and generally hated agents include mice and rats, especially their protein-rich urine, and numerous insect pests. Cockroaches are bad enough, but even microscopic "flakes" from their dead bodies can cause significant distress for some people.

Allergists and respiratory specialists generally look at several major categories of health problems related to biological pollution, including allergic, infectious, and toxic reactions, although many are interrelated, especially as conditions favorable to one problem are advantageous to others, particularly where moisture, warmth, and humidity are involved.

An allergy is basically the immune system's response to an unwanted foreign substance or allergen, such as pollen or pet dander. In sensitive individuals, this response goes well beyond sniffling and sneezing and can take the form of a severe and even life-threatening overreaction. Upon entering the body, allergens prompt the body's immune system to produce millions of antibodies which attach themselves to cells throughout the body, ready and waiting for another "invasion" by that specific substance. When the allergen is detected, the antibodies trigger the cells to release chemicals called histamines to help destroy the allergens, although the allergic reaction can often pose more of a health threat than the allergen itself.

Infectious reactions or diseases are the handiwork of bacteria and viruses, and are easily spread via contaminated countertops, improperly cleaned cooking utensils, and through the air from person to person. Bacteria and viruses can also be brought into the home from the outdoors on dirty shoes or soiled clothing, or even by bringing plants inside from a garden or patio. Airborne diseases, which can also be spread via some ventilation systems, have also demonstrated a much higher viability in moist environments where they can survive until meeting up with a new host -- or victim.

Toxic reactions have started to receive a great deal more attention as discussions mount regarding sick building syndrome. Among the best known example is humidifier fever, brought about by toxins released by microorganisms and fungi thriving in poorly maintained or designed heating and cooling systems, both in large commercial properties and in some typical residential systems and home humidifier units.

Drying Out

While increased cleanliness, better cleaning habits, and air filters can help control some of the particulate contaminants in the home, there is no doubt that water and moisture play perhaps the most significant role in creating biological pollution. Standing or stagnant water, or water-damaged materials (wood, wallboard, carpeting or carpet pads) are breeding grounds for insects, bacteria, and other pests. Cold exterior wall surfaces, especially inside closets or behind furniture and bookcases, can experience condensation, thereby triggering fungal outbreaks of mold and mildew, along with their attendant allergens and toxins. And warm, moist conditions are ideal for dust mites, which represent a one of the most ubiquitous and potent allergens in most homes.

Unfortunately, this "muggy" indoor environment is fairly much the norm in the northern part of the U.S., where studies cited by the American Lung Association found that approximately 30-50 percent of all homes and large structures demonstrate a high relative humidity -- exceeding 50 percent. In addition, research found other signs of periodic dampness in these homes, often resulting from seasonal flooding, leaks, and so on.

Making Your Home Healthier

To prevent the rash of problems likely to result in a tropical household, the Environmental Protection Agency recommends that relative humidity be controlled to 30-50 percent, and that remedial steps be taken to better manage other sources of moisture. The following is a room-by-room recipe for a healthier home.

Basement: If carpeting is used on a concrete floor, install a vapor barrier (basically a plastic sheeting) to keep moisture from entering the carpet backing and fibers. Clean and dry water-damaged carpets within one day -- or consider replacing the carpet. Also, it might be advisable to simply use another flooring surface or removable area rugs. Check for and repair any sources of leaks or water damage, especially around windows and exterior stairwells. Increase air circulation and consider using a dehumidifier in damp sublevels, and be sure to frequently drain (every day) and clean the "evaporation tray" or collection reservoir.

Kitchen: Install and use an exhaust fan -- or at least open a window -- when cooking, hand-washing dishes, or using a dishwasher, etc., to vent moisture to the outdoors. Do not rely on the all-too-common rangetop hoods which simply filter cooking particulates. Periodically check, empty, and thoroughly clean refrigerator drip pans; check for moldy gaskets and clean or replace them. Carefully clean all food preparation areas and utensils. However, exercise caution when using various cleaning products; do not mix different types of cleaning agents. Consider using an effective organic or botanically-derived alternative. Clean and rinse sponges and frequently change dish towels since disease pathogens are sometimes spread by cleaning with contaminated cleaning aids; use a different sponge for each different cleaning chore. Clean all damp surfaces in the kitchen.

Utility Room: Vent dryers and consider using an exhaust fan when washing laundry. "Air dry" wet laundry outdoors.

Bathrooms: Use an exhaust fan to vent moisture or open a window. Replace and clean towels and bathmats regularly. Clean and dry surface areas thoroughly; use the same amount care as with kitchen sanitation, especially since many bathroom cleaners contain caustic chemicals and release harmful vapors. Remove, vigorously clean, or replace moldy shower or window curtains.

Bedrooms: Individuals with a low tolerance for dust and dander should avoid down-filled pillows and comforters, and should use allergenic-proof mattress pads, as well as foam rubber and other synthetic bedding materials. Further, bedclothes should be frequently laundered with hot water reaching 130 degrees or more.

Attics and Crawl Spaces: Check areas for leaks or water damage, provide exterior venting and improve air circulation. Cover the dirt "flooring" of crawl spaces under the house with a vapor barrier to keep out moisture and control pest infiltration.

General Household: Improve overall air circulation by ensuring that fresh air can enter the house via air exchangers or by opening windows; move furniture away from exterior walls; and leave doors into rooms partially open most of the time, including closet doors -- paying special attention to closets with exterior walls. Remove all traces of mold through cleaning; do not simply paint or wallpaper over damaged areas. Change or clean air filters for heating and cooling systems regularly, including window air conditioners, whose evaporation trays should also be examined and cleaned periodically. If a central humidifier is being used, carefully observe the recommended maintenance schedule; with portable units, change water as directed and clean all water-contact surfaces. Dusting and vacuuming can be torture for sensitive individuals, as the act of cleaning often stirs up a universe of mite allergens and other contaminants. Highly allergic people should leave areas (or homes) being cleaned; others should wear a protective mask, and use a dampened cloth or sponge-mop for cleaning. Vacuum and dust often to remove surface dust and reduce dust mite habitat. A central vacuum system is advisable for the acutely sensitive, although rather costly. Other extreme measures can include replacing wall-to-wall carpeting with washable area rugs and replace window blinds or delicate shades with washable curtains.

Copyright 2012, Joseph M. Keyser

Wednesday, March 07, 2012

Easy Orchids for Exotic Living

Orchids are perhaps the most exotic, breathtaking, and unique of all flowering plants. However, their frequent association with mist-shrouded jungle canopies has led many gardeners to think that growing them is beyond their everyday ability. Fortunately, you need not move to a remote tropical island or invest in a greenhouse to enjoy these fantastic jewels of nature.

If you can successfully grow indoor flowering plants, then you will happily find that there are scores of brilliant and affordable orchids to fit every situation and room in your home.

There are estimated to be between 30-40 thousand different species of orchids found in nature, and the incredible popularity of this plant family has led to the cloning and hybridization of more than a million different species. Finding the right plant to match the light level and wallpaper in your living room should not require a major expedition.

Over the years, orchid hobbyists and growers have found that several genera are quite easily grown under normal indoor conditions. For the most part, if you can provide lighting conditions similar to those required for African violets, such as bright east or west-facing windows, or a shaded southern window with no direct sun, you can provide a suitable light environment for most orchids. Even a sunny, southern exposure filtered with sheer curtains can be suitable for orchids requiring higher light levels.

Among the best plants for beginners with moderate light conditions are Phalaenopsis, Paphiopedilum, Miltonia and Miltoniopsis, with Paphiopedilum being the most tolerant of shady conditions, perhaps even a bright northern window. If somewhat brighter lighting conditions can be provided, prepare yourself for the showy and fragrant spectacle provided by Dendrobiums, Cattleyas, Oncidiums, and Brassias.

According to a survey by the American Orchid Society, the world’s largest plant society, Phalaenopsis have been selected as America’s favorite orchid, which is fitting as it is also considered to be the most easy to grow. Phalaenopsis are also known as moth orchids, because their sprays of wing-like blooms bear a striking resemblance to clusters of brilliantly colored moths perched upon a branch. Under proper indoor conditions, this native of tropical lowlands can provide blooms for up to eight months of the year, perhaps producing flower spikes twice each year.

Paphiopedilum are commonly called “Lady’s-slipper orchids,” thanks to their tell-tale flower “pouches,” and produce long lasting flowers along an upright spike or stem. The blooms themselves can last up to ten weeks and offer an array of pink, gold, white and lavender, often combined together in a single, stunning flower with darker shaded veins.

Cattleya are often larger plants with huge white, pink, or purple blossoms, traditionally thought of as corsage flowers. Generally larger “cats” will bloom once a year with flowers lasting up to three weeks, although some hybrids can last up to eight weeks under ideal conditions. However, the full-sized plant is often too large for most home conditions, and a generous number of miniature Cattleyas are available, often less than ten inches tall. The mini-cats are known to flower twice a year, with blooms lasting up to one month. Both large and small versions are fragrant when the blossom is fully open.

If fragrance is important, one of the most sweetly scented orchids is Oncidium 'Sharry Baby.' This prolific blooming plant is sometimes called – and marketed – as the "Chocolate Lover's Orchid." The one to two inch blooms, which can reportedly number over three hundred on a fully mature plant, are deep ruby red or mahogany and exude a rich and warm chocolate fragrance.

Brassias are among the most exotic looking orchids, although they are easy to grow and bring to flower, sometimes more than once a year. Commonly and aptly named the Spider Orchid, most of the popular hybrids produce hundreds of colorful spidery blooms on long, adventurous stems which can last up to one month.

Of course, there is more to raising any plant than simply picking out a pretty one and offering it a bright window. Remember that a large number of orchids come from tropical climates and prefer high humidity, usually anywhere from 50 to 60 percent or more, and sometimes up to 75 percent. Most homes usually remain in the 35-50 percent range during the winter.

In fact, with few exceptions, a great many orchid species are epiphytes, meaning that they live on or above a plant, usually in trees, and obtain moisture from the air itself or from rainfall running down the sides of their host plants. Short of hosing down your living room on a daily basis, potential orchid growers will have to increase the humidity around their plants using some form of humidity tray. Daily misting is generally not sufficient and is frequently impractical.

Perhaps the most simple type of humidity tray is a pan, even a cookie sheet, filled with pea gravel or pebbles. Orchids are placed on overturned saucers set atop the pebbles so that the orchid’s pot is never sitting in water. Water should be added to cover the pebbles on a regular basis, and replaced periodically. Evaporation from the pebbles will create a lush, humid environment around the plants, without turning the rest of your home into a sauna.

In addition to humidity, orchids will require watering and feeding. Remember that many of these tropical transplants are used to rain forest conditions, where they receive intermittent downpours, and so generally prefer a period where their growing medium is almost allowed to dry out between waterings. However, orchids should never be allowed to sit in soggy pots, which can lead to root rot and other diseases. Also, watering and misting should always take place in the morning, allowing leaves to dry before nightfall.

The growing medium itself is important. Many orchids are adapted to grow in soil-free conditions, which is why the majority of epiphytic species are cultivated in specialized orchid mixtures, usually consisting of varying grades of fir bark, poultry peat, perlite, and other additives. These beautiful tree huggers also obtain nutrients from debris washing over or falling onto their roots, and consequently will require frequent dilute feedings, from biweekly to monthly, depending on the individual plant and time of year.

Lastly, ensure that air can move around the plants readily, much like those balmy tropical breezes. Should you decide to keep a number of plants grouped together in a corner, you might want to consider using either a ceiling fan – or small tabletop fan – operating at a slow speed, just enough to keep the air circulating.

Naturally, the actual culture and care for each species of orchid is different with respect to potting media, feeding, humidity, and so forth, and you should rely on the careful directions which any conscientious grower or vendor will readily supply.

However, before ever purchasing that first, towering Dendrobium, canes waving aloft with large, brilliant sprays of flowers, you might want to contact an accomplished orchid grower or visit a public orchid show. You will discover that while there are many orchids perfect for your conditions, there are other genera, like Cymbidium, which simply require too much dedication and foster care.

Copyright 2012, Joseph M. Keyser

Monday, March 05, 2012

Putting Your Soil to the Test

Healthy soil is the single most important ingredient for successful lawns, yards, and gardens. Unfortunately, it is the one element generally overlooked by homeowners as they head into their neighborhood garden center, hell-bent on beating some pest or jazzing up the green in their grass.

The simple fact is that healthy soil produces healthy plants. Period. Anything done to improve the yard or garden which does not consider the needs of the soil is a waste of time -- and potentially damaging both to the soil and to the community of plants it supports.

For the most part, healthy plants do not attract pests and are seldom bothered by the more common plant diseases. Pests are rather an indicator that a plant is suffering environmental stress, whether nutrient deficiencies and unsuitable soil pH, which are also reflected in poor color or discoloration of leaves or disappointing blooming, or other problems impacting root health, and therefore plant health and vigor, such as lack of moisture retention, poor drainage, poor soil aeration, and related factors. Addressing symptoms like insect predation does not solve the real problem, which is the quality of the soil: its structure, pH, organic content, and mineral composition. It is better to correct the problem at its source -- curing "sick" soil -- rather than focusing on pesticide band-aids for undesirable symptoms.

The Root of the Problem

Soil is a complex combination of minerals, organic matter, water, air, and a dynamic ecosystem of microorganisms, worms, and other valuable critters. Through chemical and, especially, biological action, soil provides a sustainable supply of nutrients, moisture, and gases which plants need to grow and thrive. Plants and soil get along just fine together -- the problem seems to be people getting mixed up in the process.

Removing grass clippings and hauling away autumn leaves is akin to strip-mining the earth. And spraying or spreading synthetic chemicals such as fertilizers and pesticides on a lawn or garden can kill, drive off, or otherwise disrupt the beneficial organisms which naturally keep soils healthy and fertile. Over time, this abuse can lead to an accumulation of toxic salts in the soil, impoverished nutrient levels, acidity, and compaction. The gardener has killed the soil with kindness, resulting in a virtual green desert which will need continued, costly, and artificial support, not unlike a hydroponic system. None of which is the desired result, either for the individual -- or the environment.

The first, best step to turn conditions around is to learn more about the soil in your yard or garden, discover what your soil really needs to support your lawn and plantings, and establish a simple program to ensure long-term soil health.


Soil Testing

"Thinking" that your lawn needs various additives and amendments is a dangerous way to proceed. There is very little benefit to be had from lugging home heavy, dusty bags of lime or fertilizer without first taking the time to assess the actual condition of your soil.

In some cases there are visual indicators that your soil is in trouble. For example, large patches of moss in a lawn usually signal acidic (low pH) conditions and poor drainage. Some weeds, especially plantain, are most often found in lawns with heavy, compacted soils, and can also indicate acidic and/or waterlogged conditions. But, again, these and other weeds are only symptoms, and even though they may indicate a low-lime or acid soil, it is more important to conduct a thorough test to determine the correct application rates for lime and other amendments.

Moreover, while there are numerous ways to perform some "home tests" yourself, including a variety of pH test kits, remember that soil pH is only a part of the soil equation. It is almost certainly better to have the testing done professionally, especially by someone who can help interpret the results and direct a remedial course of action. In addition, it is preferable to have a test that covers a range of soil conditions, probably more parameters than any homeowner would care to undertake using $45 electronic pH meters or shaking jars full of soil samples and water to determine soil texture.

You will find that most local garden centers and nurseries provide soil test services, usually for fees in the neighborhood of 20 dollars and up. In addition, many Cooperative Extension Service Soil Test Laboratories will provide mail-order test kits and instructions to homeowners, even to those in neighboring states (should your local or state office no longer offer such services).

Regarding the soil test, there are several things to keep in mind, including the fact that you will need to take samples from at least several areas on your property, and you may need to have several tests run, one for each type of soil use: a test for the lawn, a test for planting beds, and perhaps a separate test for a vegetable garden. For example, when testing the soil for your lawn, you will want to determine an "average" for the overall lawn area: follow the instructions on the kit carefully, cleaning away any organic matter (grass clippings, fallen leaves, etc.), and take at least half a dozen to one dozen samples from different locations. Mix the samples together completely, and send a representative sample off to be tested. If conditions vary dramatically from the front yard to the back, due to exposure, soil type, grading variants, and so forth, you may want to have two tests done, as different care may be required for each area. Use the same protocol for samples from other planting areas. Remember that the soil in a vegetable garden is going to be significantly different from that in a lawn, especially over a period of time, with each respective area having unique needs regarding nutrients, pH, and organic amendments.

The test results will provide solid, scientific, and reliable guidance for improving your soil. A follow-up call to your local Cooperative Extension Service office will also help you develop a basic management program for your yard and garden, either through a personal consultation or through a host of useful publications and gardening tips.

Finally, keep in mind that the testing process is only a snapshot of your soil environment, and recommended amendments are designed to deal with soil conditions at that period of time. Your soil will change from season to season, and from year to year. The best advice is to plan on having your soil tested on a regular basis for the first couple of years, especially if you have never had it tested before, or if your soil test results indicate severe problems. Also, if you are only starting to implement an organic program to undo the ravages of years of chemical applications, it will take a while for the soil ecology -- and, therefore, basic health of the soil -- to recover. After several years of regular testing, you can then reduce your testing frequency to once every couple of years.

Is it worth it? The modest ten to fifteen dollar annual investment in testing will result in healthy soil -- and a sustainable healthy lawn and garden. That should prove worthwhile it itself. Also, you may actually save a significant amount of money traditionally squandered on unnecessary fertilizers and pesticides, with savings that are meaningful both for your wallet and for your environment. Soil health means plant health -- which translates into an environment spared the all-too-common abuses of nutrient runoff, groundwater contamination, poisoned streams, and toxic threats to people and wildlife.

Copyright 2012, Joseph M. Keyser