Showing posts with label Soil. Show all posts

Friday, July 18, 2014

Sunlight Will Set Your Soil Straight

Everybody knows that sunlight makes plants grow. But did you know that solar energy can help you “grow” healthier soil? If not, welcome to the solar-powered world of soil solarization!

Solarization is a safe, non-chemical, and effective method for controlling the host of pests and diseases which might be lurking in your garden soil -- harmful bacteria, fungi, and nematodes, as well as insect eggs, root-gnawing larvae, and weed seeds.

Of course, most of your landscape gets along just fine without special intervention, but for vegetable gardeners and folks with specialized garden beds, such as dahlia collections or an annual cutting garden, going solar can help prevent problems, while enhancing any site’s horticultural performance.

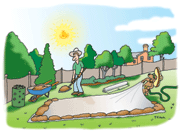
Solarization is a creative spin on the greenhouse effect, which uses simple plastic sheeting and the sun’s radiant energy to help sanitize the top six to eight inches of garden soil. And although the process does require setting aside a garden area for about two months during the summer, it is far safer and less expensive than using toxic soil pesticides or other fumigation methods.

Experienced gardeners know that they should rotate their vegetable crops each year and select disease-resistant varieties to control soil-borne diseases. However, this is not always a practical option for some gardeners with limited space, and after a while, any soil used and planted repeatedly with similar crops will be still be infested with damaging populations of the most persistent pathogens, like verticillium and fusarium wilt, as well as parasitic nematodes, along with other weed and pest problems.

By using solarization to dramatically elevate soil temperatures up to 140 degrees for a period of weeks, you can essentially bake those problems away. Moreover, solarized soil is rapidly re-colonized by beneficial bacteria and fungi, such as those which help fix nitrogen in the soil, while yet other beneficial microorganisms will fill the void to help fight off pathogens in the future. In short, your soil will be healthier and better able to enhance plant growth and crop yields.

To begin, select a garden bed or planting area at least 30 to 36-inches wide, which is normally the most practical width for planting. Smaller strips probably will not generate or retain enough heat to be effective.

Remove all visible vegetation and other plant debris, and then cultivate the soil to a depth of six inches or more. It is generally preferable to use a rototiller to break up any clumps and provide a smooth, friable medium. Keeping the texture of the soil smooth is essential to prevent the formation of air pockets which will interfere with heat generation and conduction. Also, carefully rake over the surface of the planting area to ensure that it is completely free of stones or other coarse materials which might tear or puncture the plastic sheeting.

During cultivation, be sure to add any desired organic amendments such as compost, or any fertilizer or lime, which might have been called for by a soil test. If you are planning to use soaker hoses or drip irrigation, you should put those elements in place now. Please note that after solarization, you do not want to till or disturb the soil, as that will only expose buried weed seeds. Finish by digging a trench approximately six to eight inches deep and wide around the perimeter of your garden bed.

Next, water the planting area thoroughly. Use a sprinkler or soaker hose system and let it soak the prepared soil for at least several hours, penetrating almost to a depth of one foot. Every square inch of soil must be moistened for adequate heat generation.

Afterwards, cover the area with a clear plastic sheet made from UV-stabilized or resistant polyethylene or PVC. Untreated plastic film will degrade in sunlight, and neither black nor opaque plastic will generate sufficient heat.

Selecting the proper thickness of plastic tarp is important. While very thin film (.5-1 mil) is less expensive, it tends to rip very easily, and would only be suitable for one use. Thicker plastic (4-6 mil) is tougher and lasts longer, but does not allow as much more sunlight to pass through. Instead, try to find a medium sheet (1-3 mils), and stretch the plastic tight and smooth across the planting surface.

In addition, for increased effectiveness, consider using a double-layer of plastic with an insulating air space between the layers. You can easily separate the two layers using empty aluminum cans. The extra layer can increase soil temperatures by another six degrees, while also retaining more heat on overcast days and at night.

After getting your plastic firmly in place and tucked down into your trench, backfill with soil to bury the ends of the sheet – and just wait for the sun to do the rest. If your solarized bed is in an especially windy location, you might want to place some bricks or rocks on top of the trenched area as an additional anchor.

For the most part, solarization should be undertaken anytime during the hottest, brightest months, from June through August. It can be done earlier or later, but additional time under wraps would be required, up to three months. Traditional summertime treatment requires four to six weeks, and as much as eight, if the skies were particularly cloudy, or if you have been plagued with stubborn, noxious weeds for years.

After solarizing, carefully remove and store the plastic for another use in a subsequent year. You garden bed is now ready for planting. If you do not plan to plant for several months, with a cool weather crop, for example, be sure to cover the bed with a weed-free mulch.
Lastly, remember that solarization only eliminates or reduces pest organisms and weed seed from the top several inches of soil. Do not disturb your sanitized soil any more than is necessary to slip in your new plants.

Copyright 2014, Joseph M. Keyser

Tuesday, March 13, 2012

Going Solar to Set Your Soil Straight

Everybody knows that sunlight makes plants grow. But did you know that solar energy can help you “grow” healthier soil? If not, welcome to the solar-powered world of soil solarization!

Solarization is a safe, non-chemical, and effective method for controlling the host of pests and diseases which might be lurking in your garden soil -- harmful bacteria, fungi, and nematodes, as well as insect eggs, root-gnawing larvae, and weed seeds.

Of course, most of your landscape gets along just fine without special intervention, but for vegetable gardeners and folks with specialized garden beds, such as dahlia collections or an annual cutting garden, going solar can help prevent problems, while enhancing any site’s horticultural performance.

Solarization is a creative spin on the greenhouse effect, which uses simple plastic sheeting and the sun’s radiant energy to help sanitize the top six to eight inches of garden soil. And although the process does require setting aside a garden area for about two months during the summer, it is far safer and less expensive than using toxic soil pesticides or other fumigation methods.

Experienced gardeners know that they should rotate their vegetable crops each year and select disease-resistant varieties to control soil-borne diseases. However, this is not always a practical option for some gardeners with limited space, and after a while, any soil used and planted repeatedly with similar crops will be still be infested with damaging populations of the most persistent pathogens, like verticillium and fusarium wilt, as well as parasitic nematodes, along with other weed and pest problems.

By using solarization to dramatically elevate soil temperatures up to 140 degrees for a period of weeks, you can essentially bake those problems away. Moreover, solarized soil is rapidly re-colonized by beneficial bacteria and fungi, such as those which help fix nitrogen in the soil, while yet other beneficial microorganisms will fill the void to help fight off pathogens in the future. In short, your soil will be healthier and better able to enhance plant growth and crop yields.

To begin, select a garden bed or planting area at least 30 to 36-inches wide, which is normally the most practical width for planting. Smaller strips probably will not generate or retain enough heat to be effective.

Remove all visible vegetation and other plant debris, and then cultivate the soil to a depth of six inches or more. It is generally preferable to use a rototiller to break up any clumps and provide a smooth, friable medium. Keeping the texture of the soil smooth is essential to prevent the formation of air pockets which will interfere with heat generation and conduction. Also, carefully rake over the surface of the planting area to ensure that it is completely free of stones or other coarse materials which might tear or puncture the plastic sheeting.

During cultivation, be sure to add any desired organic amendments such as compost, or any fertilizer or lime, which might have been called for by a soil test. If you are planning to use soaker hoses or drip irrigation, you should put those elements in place now. Please note that after solarization, you do not want to till or disturb the soil, as that will only expose buried weed seeds. Finish by digging a trench approximately six to eight inches deep and wide around the perimeter of your garden bed.

Next, water the planting area thoroughly. Use a sprinkler or soaker hose system and let it soak the prepared soil for at least several hours, penetrating almost to a depth of one foot. Every square inch of soil must be moistened for adequate heat generation.

Afterwards, cover the area with a clear plastic sheet made from UV-stabilized or resistant polyethylene or PVC. Untreated plastic film will degrade in sunlight, and neither black nor opaque plastic will generate sufficient heat.

Selecting the proper thickness of plastic tarp is important. While very thin film (.5-1 mil) is less expensive, it tends to rip very easily, and would only be suitable for one use. Thicker plastic (4-6 mil) is tougher and lasts longer, but does not allow as much more sunlight to pass through. Instead, try to find a medium sheet (1-3 mils), and stretch the plastic tight and smooth across the planting surface.

In addition, for increased effectiveness, consider using a double-layer of plastic with an insulating air space between the layers. You can easily separate the two layers using empty aluminum cans. The extra layer can increase soil temperatures by another six degrees, while also retaining more heat on overcast days and at night.

After getting your plastic firmly in place and tucked down into your trench, backfill with soil to bury the ends of the sheet – and just wait for the sun to do the rest. If your solarized bed is in an especially windy location, you might want to place some bricks or rocks on top of the trenched area as an additional anchor.

For the most part, solarization should be undertaken anytime during the hottest, brightest months, from June through August. It can be done earlier or later, but additional time under wraps would be required, up to three months. Traditional summertime treatment requires four to six weeks, and as much as eight, if the skies were particularly cloudy, or if you have been plagued with stubborn, noxious weeds for years.

After solarizing, carefully remove and store the plastic for another use in a subsequent year. You garden bed is now ready for planting. If you do not plan to plant for several months, with a cool weather crop, for example, be sure to cover the bed with a weed-free mulch.
Lastly, remember that solarization only eliminates or reduces pest organisms and weed seed from the top several inches of soil. Do not disturb your sanitized soil any more than is necessary to slip in your new plants.

Copyright 2012, Joseph M. Keyser

Monday, March 05, 2012

Putting Your Soil to the Test

Healthy soil is the single most important ingredient for successful lawns, yards, and gardens. Unfortunately, it is the one element generally overlooked by homeowners as they head into their neighborhood garden center, hell-bent on beating some pest or jazzing up the green in their grass.

The simple fact is that healthy soil produces healthy plants. Period. Anything done to improve the yard or garden which does not consider the needs of the soil is a waste of time -- and potentially damaging both to the soil and to the community of plants it supports.

For the most part, healthy plants do not attract pests and are seldom bothered by the more common plant diseases. Pests are rather an indicator that a plant is suffering environmental stress, whether nutrient deficiencies and unsuitable soil pH, which are also reflected in poor color or discoloration of leaves or disappointing blooming, or other problems impacting root health, and therefore plant health and vigor, such as lack of moisture retention, poor drainage, poor soil aeration, and related factors. Addressing symptoms like insect predation does not solve the real problem, which is the quality of the soil: its structure, pH, organic content, and mineral composition. It is better to correct the problem at its source -- curing "sick" soil -- rather than focusing on pesticide band-aids for undesirable symptoms.

The Root of the Problem

Soil is a complex combination of minerals, organic matter, water, air, and a dynamic ecosystem of microorganisms, worms, and other valuable critters. Through chemical and, especially, biological action, soil provides a sustainable supply of nutrients, moisture, and gases which plants need to grow and thrive. Plants and soil get along just fine together -- the problem seems to be people getting mixed up in the process.

Removing grass clippings and hauling away autumn leaves is akin to strip-mining the earth. And spraying or spreading synthetic chemicals such as fertilizers and pesticides on a lawn or garden can kill, drive off, or otherwise disrupt the beneficial organisms which naturally keep soils healthy and fertile. Over time, this abuse can lead to an accumulation of toxic salts in the soil, impoverished nutrient levels, acidity, and compaction. The gardener has killed the soil with kindness, resulting in a virtual green desert which will need continued, costly, and artificial support, not unlike a hydroponic system. None of which is the desired result, either for the individual -- or the environment.

The first, best step to turn conditions around is to learn more about the soil in your yard or garden, discover what your soil really needs to support your lawn and plantings, and establish a simple program to ensure long-term soil health.


Soil Testing

"Thinking" that your lawn needs various additives and amendments is a dangerous way to proceed. There is very little benefit to be had from lugging home heavy, dusty bags of lime or fertilizer without first taking the time to assess the actual condition of your soil.

In some cases there are visual indicators that your soil is in trouble. For example, large patches of moss in a lawn usually signal acidic (low pH) conditions and poor drainage. Some weeds, especially plantain, are most often found in lawns with heavy, compacted soils, and can also indicate acidic and/or waterlogged conditions. But, again, these and other weeds are only symptoms, and even though they may indicate a low-lime or acid soil, it is more important to conduct a thorough test to determine the correct application rates for lime and other amendments.

Moreover, while there are numerous ways to perform some "home tests" yourself, including a variety of pH test kits, remember that soil pH is only a part of the soil equation. It is almost certainly better to have the testing done professionally, especially by someone who can help interpret the results and direct a remedial course of action. In addition, it is preferable to have a test that covers a range of soil conditions, probably more parameters than any homeowner would care to undertake using $45 electronic pH meters or shaking jars full of soil samples and water to determine soil texture.

You will find that most local garden centers and nurseries provide soil test services, usually for fees in the neighborhood of 20 dollars and up. In addition, many Cooperative Extension Service Soil Test Laboratories will provide mail-order test kits and instructions to homeowners, even to those in neighboring states (should your local or state office no longer offer such services).

Regarding the soil test, there are several things to keep in mind, including the fact that you will need to take samples from at least several areas on your property, and you may need to have several tests run, one for each type of soil use: a test for the lawn, a test for planting beds, and perhaps a separate test for a vegetable garden. For example, when testing the soil for your lawn, you will want to determine an "average" for the overall lawn area: follow the instructions on the kit carefully, cleaning away any organic matter (grass clippings, fallen leaves, etc.), and take at least half a dozen to one dozen samples from different locations. Mix the samples together completely, and send a representative sample off to be tested. If conditions vary dramatically from the front yard to the back, due to exposure, soil type, grading variants, and so forth, you may want to have two tests done, as different care may be required for each area. Use the same protocol for samples from other planting areas. Remember that the soil in a vegetable garden is going to be significantly different from that in a lawn, especially over a period of time, with each respective area having unique needs regarding nutrients, pH, and organic amendments.

The test results will provide solid, scientific, and reliable guidance for improving your soil. A follow-up call to your local Cooperative Extension Service office will also help you develop a basic management program for your yard and garden, either through a personal consultation or through a host of useful publications and gardening tips.

Finally, keep in mind that the testing process is only a snapshot of your soil environment, and recommended amendments are designed to deal with soil conditions at that period of time. Your soil will change from season to season, and from year to year. The best advice is to plan on having your soil tested on a regular basis for the first couple of years, especially if you have never had it tested before, or if your soil test results indicate severe problems. Also, if you are only starting to implement an organic program to undo the ravages of years of chemical applications, it will take a while for the soil ecology -- and, therefore, basic health of the soil -- to recover. After several years of regular testing, you can then reduce your testing frequency to once every couple of years.

Is it worth it? The modest ten to fifteen dollar annual investment in testing will result in healthy soil -- and a sustainable healthy lawn and garden. That should prove worthwhile it itself. Also, you may actually save a significant amount of money traditionally squandered on unnecessary fertilizers and pesticides, with savings that are meaningful both for your wallet and for your environment. Soil health means plant health -- which translates into an environment spared the all-too-common abuses of nutrient runoff, groundwater contamination, poisoned streams, and toxic threats to people and wildlife.

Copyright 2012, Joseph M. Keyser